Add Row
Add Element
cropper
update
HealthWorks Nevada
update
Add Element
  • Home
  • Categories
    • Quick & Healthy Recipes
    • Mind & Mood Boosters
    • Longevity & Vitality
    • Everyday Health Hacks
    • Healthy Home & Environment
    • Alternative Wellness
    • Chiropractic & Body Alignment
    • Movement & Fitness
August 19.2025
3 Minutes Read

Discover How Air Fryer Apple Fritters Can Transform Quick Meals

Freshly baked apple fritters with glaze surrounded by apples showing a healthy apple fritter recipe.

Why Air Fryer Apple Fritters Are Perfect for Busy Lives

In today’s fast-paced world, busy adults often find themselves struggling to balance a nutritious diet with their hectic schedules. Luckily, air fryer recipes offer a game-changing solution that allows you to indulge in delicious meals without compromising on health or time. Air fryer apple fritters, in particular, are an easy, wholesome treat that can be prepared in under 30 minutes!

Quick and Healthy: The Ultimate Combination

Apple fritters might seem like an indulgent dessert, but with an air fryer, you can enjoy a guilt-free version packed with wholesome ingredients. By swapping traditional frying methods for air frying, you're significantly reducing the amount of oil used, making this treat a better choice for your health. Not only are these fritters quick to whip up, but they also allow you to enjoy the delightful taste of apples with a hint of cinnamon, giving you both comfort and nutrition in every bite.

The Ingredients That Make a Difference

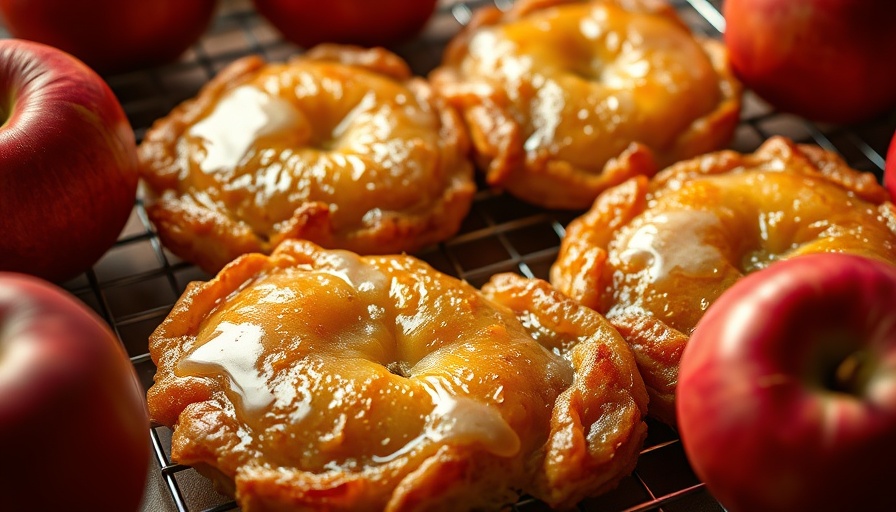
One of the best parts about making your own apple fritters is that you control the ingredients. Featuring fresh apples and a light glaze, this recipe allows you to avoid artificial additives often found in store-bought versions. The use of whole wheat flour enhances the fiber content, making these fritters not just a sweet snack, but also a source of healthy nutrients!

How to Make Air Fryer Apple Fritters—A Step-by-Step Guide

Making these fritters is as simple as it gets. Here’s a quick breakdown of the process:

  1. Preparation: Start with peeling and slicing your apples into small pieces. This not only helps them cook evenly but also allows them to absorb all the delightful flavors.
  2. Mixing the Batter: Combine your dry ingredients, including whole wheat flour, baking powder, and spices. Then, fold in the apple pieces to coat them in the batter.
  3. Air Frying: Preheat your air fryer and distribute the batter to create small fritters. Cook until golden brown, and your kitchen will fill with an irresistible aroma.
  4. Glazing: Finally, drizzle them with a light glaze made from powdered sugar and a touch of milk or apple juice for a sweet finish.

Healthy Meals in a Flash: Embrace Quick Cooking

For those busy days when you need a quick meal or a comforting dessert, air fryer apple fritters fit the bill perfectly. Preparing healthy meals quickly is essential for maintaining a balanced lifestyle—consider these fritters your new go-to solution when time is of the essence.

Tips for Healthier Eating Habits

Embracing air-fried recipes like apple fritters encourages a shift towards a more mindful and healthy diet. Some actionable tips include experimenting with different fruits, adjusting sugar levels in your glaze, or even incorporating spices like nutmeg or ginger for increased flavor. Each small change contributes to better nutrition while keeping your meals exciting and engaging!

Encouraging Family Involvement in Cooking

One of the best aspects of making these apple fritters is that it can become a fun activity for the whole family. Involving your kids not only makes cooking feel less like a chore but also encourages them to appreciate healthy eating habits from a young age. Plus, they’ll love being the taste testers!

A Call to Action: Get Cooking Today!

Now that you know the benefits of making air fryer apple fritters, why not give them a try? Making the switch to healthier meals doesn’t have to be overwhelming. Start with this simple and delicious recipe to nourish your body and delight your taste buds—all while cutting down on prep time!

Quick & Healthy Recipes

Write A Comment

*
*
Related Posts All Posts
10.06.2025

20 Minute Thai Coconut Dumpling Soup: A Quick Healthy Meal

Update The Quick Comfort of Thai Coconut Dumpling Soup In today’s fast-paced world, finding time to prepare healthy meals can be a challenge. That’s why quick and nutritious dinners are essential in every busy adult’s culinary repertoire. One recipe that stands out is the Thai Coconut Dumpling Soup. This delightful dish, known for its rich flavors and creamy texture, can be whipped up in just 20 minutes, making it an ideal option for those hectic weeknights. Why You’ll Love This Soup This Thai coconut dumpling soup is a wonderful blend of comfort and warmth. It features deconstructed pork dumplings simmered in a savory broth enriched with coconut milk and spices. By utilizing ingredients like ground pork, edamame, and bok choy, you can create a nourishing meal that appeals to all ages. Plus, it's incredibly customizable; if you're out of edamame, frozen peas work just as well! Ingredients You’ll Need To create this delicious soup, gather the following ingredients: Ground pork (or substitute with chicken, turkey, or plant-based options) Red curry paste for that signature Thai flavor Coconut milk for creaminess (it’s best not to substitute this) Wonton wrappers (or any noodle of your choice) Fresh vegetables, like edamame and bok choy, for added nutrition Steps to Prepare This Flavorful Dish Making this Thai coconut dumpling soup requires minimal effort, perfect for those busy evenings. Begin by sautéing diced onions and garlic until fragrant. Then, add in the ground pork and cook until it's well-browned. Incorporate your red curry paste and coconut milk, followed by the broth, allowing everything to mingle over heat. Finally, toss in your wonton wrappers, edamame, and bok choy, letting the dish simmer until everything is cooked through. Nutritional Value and Benefits Not only is this soup delectable, but it’s packed with nutrients too. Ground pork provides a source of protein, while the vegetables contribute fiber and vitamins important for overall health. You can adjust the level of spices to suit your taste preferences, making it great for both young children and adults. Embrace the Quick Meal Trend With more people leaning towards healthy eating, quick meals that don’t compromise on nutrition are becoming increasingly popular. Recipes like Thai Coconut Dumpling Soup exemplify how a hearty meal can be both satisfying and easy to make. This meal proves that healthy recipes don't have to take hours to prepare. Simplifying Dinner Time For those looking to streamline dinner preparation, consider batch cooking. You can prepare the broth ahead of time and store it for up to three days in the fridge. When you're ready to eat, simply reheat the broth and add your fresh dumplings. By doing this, you transform a complex recipe into a straightforward, everyday meal. Serving Suggestions This soup is divine as a standalone dish, but pairing it with a side salad can boost the nutritional value even further. For spice lovers, a drizzle of chili crunch just before serving adds an extra kick. On the other hand, if you're feeding kids, consider skipping the heat and serving the soup naturally without the chili. Final Thoughts In a world where juggling responsibilities has become the norm, meals like Thai Coconut Dumpling Soup are a blessing. It's a quick, easy recipe that delivers comfort and flavor while highlighting healthy ingredient swaps. So, embrace the rush and enjoy the process of cooking this delightful soup! Explore your culinary skills with quick and healthy recipes that keep dinner vibrant yet easy. Share this soup recipe with friends and family and bring them together over a warm bowl of goodness!

10.04.2025

Discover the Delight of High-Protein Pumpkin Tiramisu This Fall

Update Indulge in Fall Flavors With This High-Protein Pumpkin Tiramisu As autumn's chill settles in, it’s the perfect season to explore comforting desserts that combine nostalgia with nutritious ingredients. Enter a delightful twist on tradition: high-protein pumpkin tiramisu! This dessert not only satisfies your sweet tooth but also whacks in a healthy punch with 6 grams of protein per serving, making it a favorite among busy adults looking for quick and healthy recipes. Why Pumpkin Tiramisu is the Perfect Fall Dessert Imagine layers of creamy pumpkin filling, espresso-drenched Nilla wafers, and delectable whipped topping, all dusted with cocoa powder. This high-protein pumpkin tiramisu proves that indulgence doesn't have to come at the expense of your health. Instead of the traditional lady fingers, using Nilla wafers simplifies assembly and reduces the setting time, making this an accessible dessert for experimental home cooks. Key Ingredient Highlights Let’s dive into some core ingredients that define this dessert: Instant Espresso Powder: This is where the magic happens! Blending espresso with pumpkin creates a depth of flavor that marries well with the spices of fall. Unsweetened Pumpkin Puree: Essential for that iconic pumpkin flavor, ensure you opt for unsweetened to avoid an overly sweet outcome. Blended Cottage Cheese: Not only does it contribute to the creamy texture, but it's also an excellent source of protein. Forget the guilt—this makes every spoonful satisfying. Maple Syrup: Embracing autumn’s sweetness, maple syrup serves as a natural sweetener that compliments the spiced flavor profile. Cocoa Powder: A sprinkle of cocoa on top creates the finishing touch, adding both aesthetics and flavor. Step-by-Step Instructions for Your Pumpkin Tiramisu Making this dessert is straightforward, perfect for the busy adult: Prepare the espresso whip by mixing espresso powder, maple syrup, and heavy whipping cream in a stand mixer. Let it bloom for 5-10 minutes before whipping it until stiff peaks form. Mix unsweetened pumpkin puree, blended cottage cheese, maple syrup, cinnamon, and vanilla in a separate bowl until smooth. Start assembling the tiramisu by laying half of the Nilla wafers in a dish, followed by half of the pumpkin mixture and half of the whipped topping. Repeat these layers and finish with cocoa powder on top. Chill the dish in the fridge for at least 20 minutes before serving. Enjoy topped with additional whipped cream! Tips for Success For the best results, don’t skip the blooming step for the espresso—this intensifies the coffee flavor! Also, measure the cottage cheese after blending to get just the right amount for a creamy consistency. More Than Just a Dessert This pumpkin tiramisu is more than just a seasonal treat; it’s a testament to how you can integrate healthy meals into your everyday living. As the dessert proves, with simple swaps and an eye on nutrition, even desserts can align with health goals. Not to mention, pumpkin isn’t just delicious; it's also packed with vitamins and minerals! Try It Out Today! If you're ready to impress family and friends this fall, whip up a batch of this high-protein pumpkin tiramisu. It’s quick, it’s easy, and it’s bound to be a standout on any dessert table. So don’t wait—embrace the flavors of the season with this indulgent, yet nutritious dessert, and share the experience with others. Looking for more healthy recipes? Join our community for additional tips and recipes that make healthy eating accessible and enjoyable!

10.02.2025

Discover How to Create Starbucks Protein Cold Foam at Home

Update Indulge in Deliciousness: Starbucks Protein Cold Foam at Home Are you a busy adult seeking a quick and healthy treat that satisfies your coffee cravings? Look no further! This easy recipe for Starbucks Protein Cold Foam brings the café to your kitchen, allowing you to enjoy a delectable cold brew topped with protein-rich foam. Not only does it taste just like the store version, but it's also packed with beneficial protein to fuel your day. Your Guide to Homemade Protein Cold Foam Creator of this delightful foam, you don’t need to be a professional chef to whip up something that rivals Starbucks! With just three simple ingredients, you can recreate this energizing and tasty drink in under five minutes. All you need is whey protein powder, heavy cream, and Fairlife 2% milk. What’s great about this recipe is that it delivers an impressive 22 grams of protein per serving. The two scoops of whey protein work harmoniously with the rich cream and milk to create a luscious foamy texture that will elevate your coffee experience. Crafting the Perfect Protein Cold Foam Here’s the catch, though: make sure you're using a whey protein powder—both vanilla and chocolate varieties work beautifully here. Many plant-based protein powders can result in a grainy texture that just won’t froth correctly, turning into more of a thick protein milk than a foam. Thus, sticking to whey provides both the best taste and texture. For this recipe, you’ll combine 2 tablespoons of heavy cream and Fairlife 2% milk into your whey protein before frothing it all together. Not only does the heavy cream contribute to the richness, but the higher protein content of Fairlife milk ensures you’re getting the boost you need without compromising on flavor. Why This Recipe Matters for Health-Conscious Individuals Incorporating protein-rich ingredients into your diet is a fundamental part of a balanced and nutritious eating plan. Busy adults often struggle to find meals that are both convenient and healthy, and this Starbucks-inspired drink brings the two together. When you can make something quick and healthy like protein cold foam at home, it opens doors to maintaining both your health goals and coffee habits. Moreover, the versatility of this recipe allows for personalization. Whether you prefer your coffee sweetened or fortified with added flavors, you can experiment to find your ideal blend. For those who enjoy adventurous flavors, try adding a hint of vanilla extract or a dash of cinnamon for an extra kick that makes your drink uniquely yours. Serving Suggestions and Tips for Enjoying Your Foam For the best experience, serve this protein cold foam immediately after preparing it. Unlike traditional creamers, it does not hold up well over time, so enjoy it fresh! If you have any leftovers, store them in the fridge and remember to re-froth before serving to restore that delightful foaminess. Pair your protein cold foam with homemade cold brew or espresso for maximum enjoyment. You’ll find that the sweetness of the foam balances out any bitterness from the coffee, creating a divine concoction to kickstart your day. Your Next Steps Toward Quick and Healthy Meals This recipe for Starbucks Protein Cold Foam is more than just a tasty coffee addition; it's a stepping stone towards making conscious dietary choices that fit your busy lifestyle. By blending healthy recipes into your day-to-day routine, you not only save time but also enhance your nutritional profile without feeling deprived of indulgence. Ready to make your mornings more delicious? Try this simple recipe, share your experiences, and let the world know how easy it is to enjoy healthy meals right at home! Now that you know how to whip up a delightful Starbucks Protein Cold Foam at home, why not explore more easy and healthy recipes to integrate into your daily routine? Make the conscious choice to prioritize your health without sacrificing flavor!

Terms of Service

Privacy Policy

Core Modal Title

Sorry, no results found

You Might Find These Articles Interesting

T
Please Check Your Email
We Will Be Following Up Shortly
*
*
*